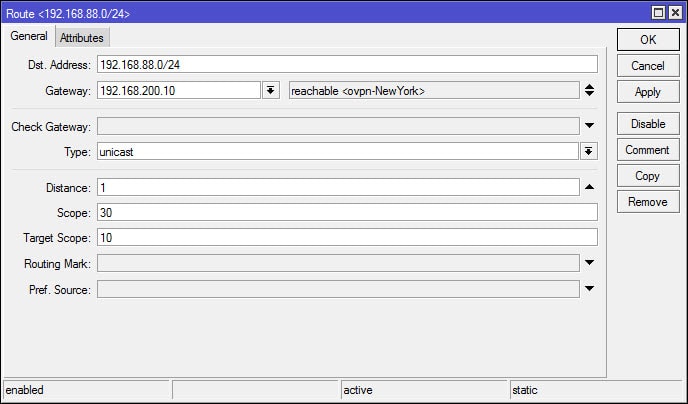
In this example, we will be using two MikroTik RB951G-2HnD running RouterOS v6.34.3 on firmware v3.24, each using a different subnet. In addition, the OpenVPN tunnel is using a different subnet as well, which means – between the two MikroTik routers and the OpenVPN tunnel, we have three different subnets. The OpenVPN local and remote IP addresses represent the respective gateway address for each end of the tunnel between MikroTik A (Server) and MikroTik B (Client). These are static IP addresses. For example, MikroTik A’s OpenVPN gateway IP address is 192.168.200.254 and MikroTik B’s OpenVPN gateway IP address is 192.168.200.10. The OpenVPN local and remote IP addresses are configured in the PPP profile, which we will get to later.
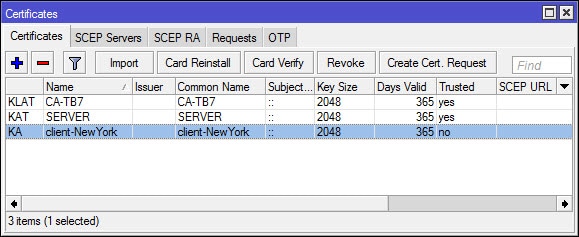
We will need to create the certificates on MikroTik A (Server). For simplicity (I hope), I’ve added the MikroTik terminal commands needed to create the certificates. Note that these commands include placeholders that will need to be changed to better suit your network environment. The variables/placeholders are encapsulated by the percent (%) symbol. I’ve included the following list of placeholders, that will need to be changed:
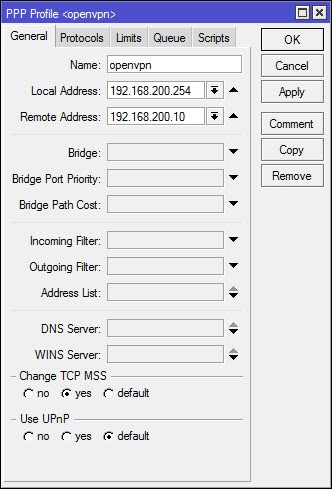
OR Navigate to PPP > Profiles and create a new PPP Profile (modify settings as needed):
In the screenshot above, don’t forget to check the protocols tab. Under the protocols tab, the option for “Use Compression” and “Use Encryption” can be set. These two options are already set in the command, but cannot be seen in the screenshot. In addition, take note of the Local and Remote IP addresses (192.168.200.254 and 192.168.200.10), these two addresses define the static IP assigned to each end of the VPN tunnel. These IP addresses can be set to anything you want as long as they don’t match any of the existing subnets that are currently in use at each site.
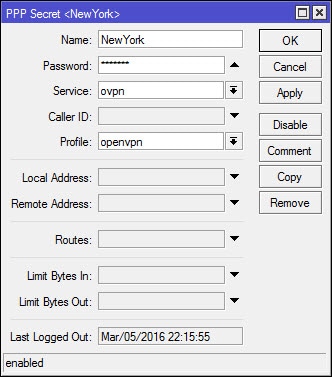
OR Navigate to PPP > Secrets and create a new PPP Secret (modify settings as needed):
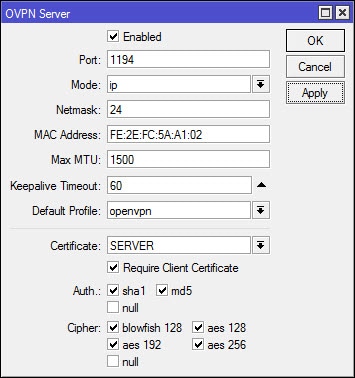
Configure the OVPN Server (modify command as needed):
/interface ovpn-server server set certificate=SERVER cipher=blowfish128,aes128,aes192,aes256 default-profile=openvpn enabled=yes require-client-certificate=yes
OR Navigate to PPP > Interface, click on the OVPN Server button and configure the OVPN Server (modify settings as needed):
9 thoughts on “MikroTik: Setup a Site-to-Site OpenVPN Connection”
Georgios
Hi, very useful article, congratulations.
192.168.88.0/24 is the local network from B SIDE?
192.168.100.0/24 is the local network from A Site, correct?
I haven’t set up a site-to-site VPN in this way yet, but I would not use OVPN for this and instead use GRE over IPSEC. Client site would need Mangle rules to mark traffic and route to Server site. Server site would need NAT/Masquerade rules and system in place to allow marked traffic out to the internet. When I have more time, I’ll see if I can create a virtual lab and test this out myself. I just don’t have a lot of time at the moment.
Honestly, I have to take my hat off for this OpenVPN tutorial!
Congratulations my dear friend, not even on video on youtube I managed to find something so well explained!

Hi, very useful article, congratulations.
192.168.88.0/24 is the local network from B SIDE?
192.168.100.0/24 is the local network from A Site, correct?
Hello Georgios,
Yes, this is correct.
how to fantastic.
Simple and functional
very good
one question.
is it possible to have multiple remote sites?
Excellent
It work.
Thank you so mush!
HI, how i can route all traffic from B (Client) to A(Server) ?
So that the all traffic inclufing internet traffic gos through the tunnel…
thx, Richard
I haven’t set up a site-to-site VPN in this way yet, but I would not use OVPN for this and instead use GRE over IPSEC. Client site would need Mangle rules to mark traffic and route to Server site. Server site would need NAT/Masquerade rules and system in place to allow marked traffic out to the internet. When I have more time, I’ll see if I can create a virtual lab and test this out myself. I just don’t have a lot of time at the moment.
Honestly, I have to take my hat off for this OpenVPN tutorial!
Congratulations my dear friend, not even on video on youtube I managed to find something so well explained!
VPN Working …
Thank you for sharing this.
Regards