
Secure Socket Tunneling Protocol (SSTP) is a proprietary security protocol developed by Microsoft. SSTP operates in situations where most VPN connections would be blocked. SSTP uses port 443 – the same port used by Secure Socket Layer (SSL) and Transport Layer Security (TLS), both widely used protocols to establish secure connections between web servers (websites) and clients/users. SSTP is considered one of the most secure VPN tunneling protocols because it utilizes SSL, authentication certificates, and 2048-bit encryption. SSTP is officially supported by Microsoft Windows Vista SP1 and above and has limited support for non-windows machines, such as those running Mac OS or Linux.
In this example, there are two locations – SiteX, which is managed by a MikroTik (SSTP server is hosted on the MikroTik) and ClientX, which is running Microsoft Windows 10. It’s important to note, that once the VPN connection is established between ClientX and SiteX, by default, all client network traffic will be routed through the VPN’s gateway. This may or may not be desirable in your particular environment. If this is an issue, I will cover VPN Split Tunneling with Microsoft Windows 10 later in this article. Split Tunneling enables the client to route traffic destined for a specific subnet (SiteX’s local subnet) out a specific gateway (VPN gateway), while all other internet traffic defaults to the clients’ local gateway.
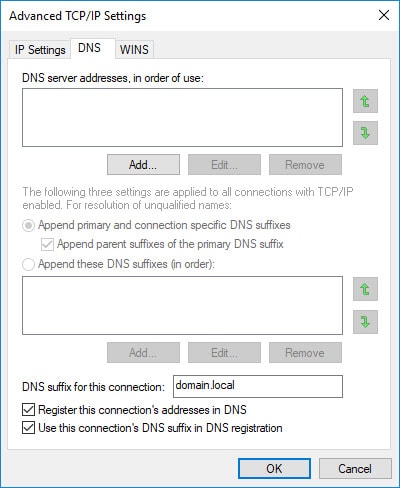
SiteX is my home lab, which does not have an authoritative DNS server in place and is not part of a domain. Instead, I’m strictly using a MikroTik router for local DNS resolution. Keep this in mind when specifying your DNS server during the MikroTik’s SSTP setup portion of this guide. In addition, though my machines are not part of a domain, I was required to add static DNS hostname entries to SiteX’s MikroTik DNS that included a domain suffix (e.g. hostname.homelab.local). Furthermore, the same domain suffix (e.g. homelab.local) is required for ClientX’s Microsoft Windows 10 VPN network adapter configuration in order to get DNS to resolve hostnames across the established VPN connection.
Generally, in a normal environment, the client’s VPN will be connecting to a network with an existing domain, in which case, the user would still have to specify a client-side DNS suffix within the Microsoft Windows 10 VPN/network adapter configuration that matches the existing domain suffix. In either case, Domain or no domain, the DNS suffix is required within the Microsoft Windows 10 VPN network adapter, in order for hostname resolution to work properly across the VPN.
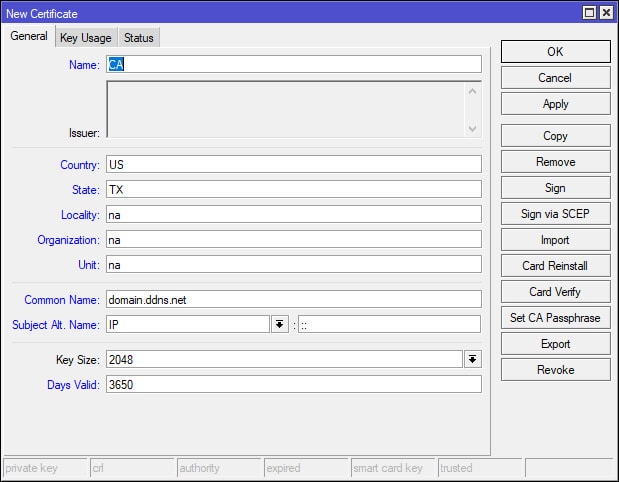
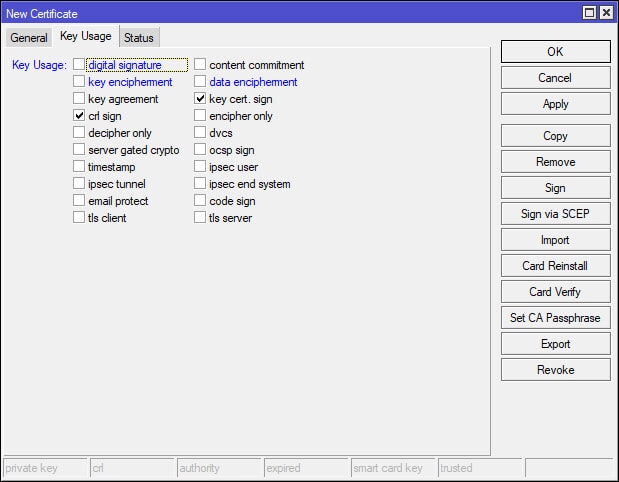
MikroTik: Create The "CA" Certificate
We will start first with the MikroTik SSTP setup portion of the guide by creating the certificates for SiteX. Two certificates are required for our SSTP VPN setup – a “Server” and “CA” (Certificate Authority) certificate, all of which, will be created via the MikroTik. Also, if you haven’t figured it out by now, we will be using Winbox (not Webfig) throughout this guide to access the MikroTik. Once you’ve logged into the MikroTik via Winbox, navigate to [System > Certificates] and apply the following settings to create the CA certificate. When creating the certificate the “Common Name” in this example would be the VPNs dynamic DNS or IP address (e.g. domain.ddns.net).
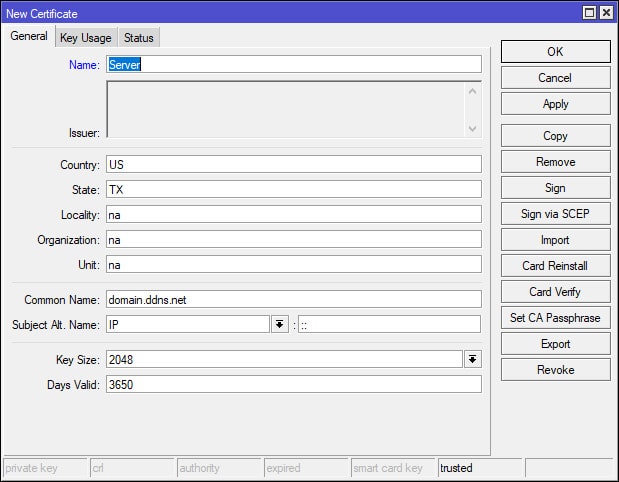
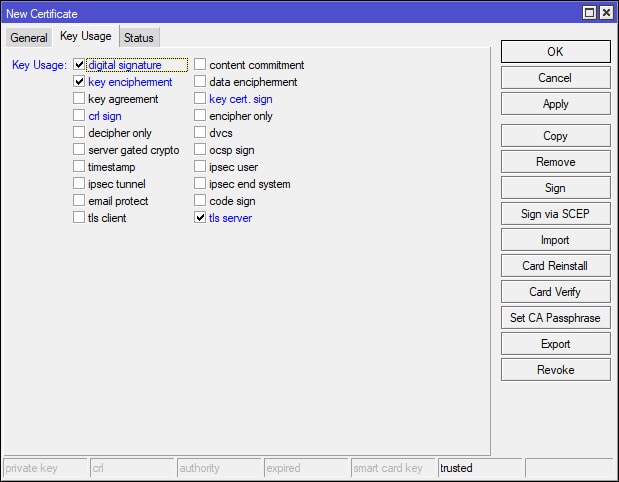
MikroTik: Create The "Server" Certificate
Now that the CA certificate has been created, it’s time to create the Server certificate. When creating the Server certificate, I simply used the Copy button on the CA certificate configurations window and modified the values of the copied configuration to match the following screenshots. After applying the necessary changes, there should now be two certificates – CA and Server.
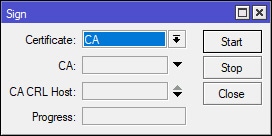
MikroTik: Sign The "CA" Certificate
Open the CA certificate that we previously created and on the right-hand side of the configuration window, click the Sign button. A new window will appear, apply the following settings in the screenshot below and click the Start button to sign the certificate.
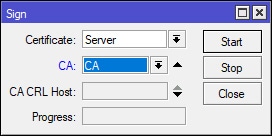
MikroTik: Sign The "Server" Certificate
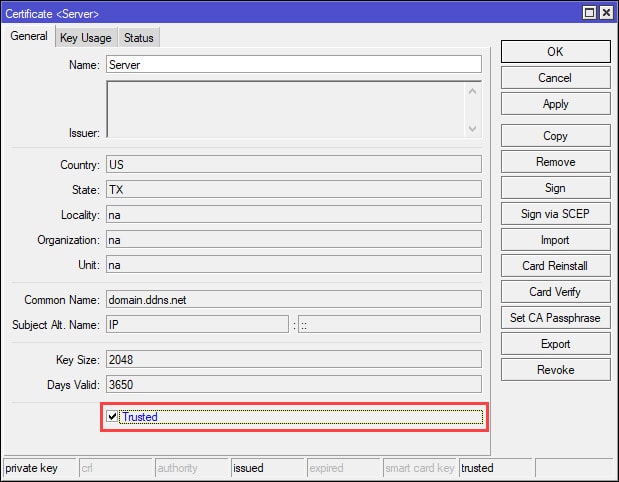
Now, repeat the same steps to sign the Server certificate. However, note that we’ve selected the CA certificate as the CA (Certificate Authority). After signing the Server certificate, open the Server certificate once more and ensure that the Trusted box is ticked.
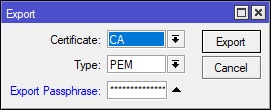
MikroTik: Export The "CA" Certificate
Open the CA certificate that we previously signed and on the right-hand side of the configuration window, select the Export button. Apply the following settings in the screenshot below. Note the use of the Export Passphrase, make it something complex/secure and select the Export button. The CA certificate will be exported as a .crt (e.g. cert_export_CA.crt) file to the root of the MikroTik’s local storage. Later, this file will need to be transferred and installed on ClientX.

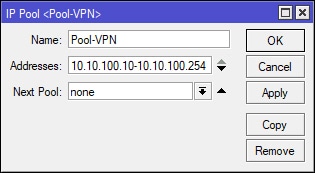
MikroTik: Create The DHCP VPN IP Pool
Select [IP > Pool] and configure the pool as needed or as shown below. This part is technically not necessary since we’re only using a single client to connect to the VPN. However, I’m going to assume that the VPN we’re creating is going to be used by many clients connecting to a single site. If so, we’re going need to create a pool from which clients will be assigned IP addresses by the MikroTik upon establishing a VPN connection. In this example, I’ve chosen IP addresses between 10.10.100.10 and 10.10.100.254. Note that 10.10.100.1 to 10.10.100.9 have been excluded from the pool. I like to keep a number of IP addresses available from the pool should I need them later. For instance, I will be using 10.10.100.1 in the next step of this guide as the VPN gateway or otherwise known as the “Local Address” during the PPP Profile setup. The remaining excluded IP addresses can be used for additional VPN connection gateways, such as OpenVPN (10.10.100.2), L2TP/IPSec (10.10.100.3) etc, but for now – I digress, we won’t be covering these VPN types in this guide. What’s important here is that we create a pool of IP addresses dedicated to connecting VPN clients and that we purposely excluded the IP address that we will be using for our SSTP VPN gateway.
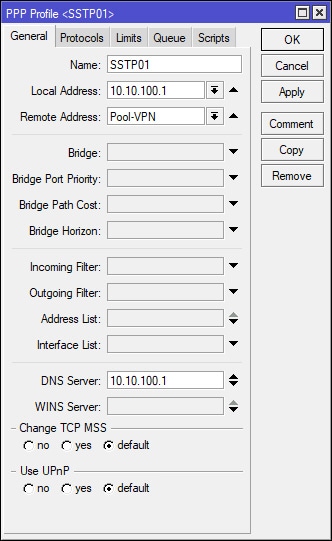
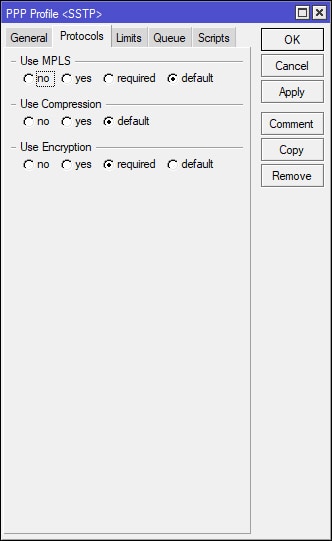
MikroTik: Create The PPP Profile
Select PPP on the left-hand side of the Winbox and navigate to the Profiles tab. Apply the following settings to create/add the PPP profile. Note that I’ve added the previously created DHCP VPN IP Pool and a Local Address of 10.10.100.1, which will be the VPN Gateway for the connected VPN client. It is important to point out that the DNS Server is 10.10.100.1 as well, because I’m using my MikroTik to resolve DNS, since SiteX does not have a dedicated DNS server. In most cases, the network that the VPN client will be connecting to will have a domain of some type with it’s own authoritative/dedicated DNS server. If this is the case, then the DNS Server IP address in the screenshot below will need to change to reflect the DNS servers IP.
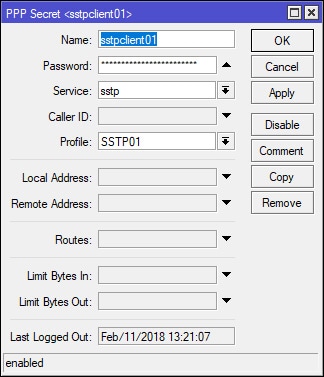
MikroTik: Create A PPP Secret (User/Client)
Select PPP on the left-hand side of Winbox and navigate to the Secrets tab. Apply the following settings to create/add a user/client. If needed, the IP address that would normally be handed out from the DHCP VPN IP pool can be overridden by setting a static address in the Remote Address field. The Name and Password values will be required by ClientX in order to connect to the VPN.
MikroTik: Configure and Enable the SSTP Server
Select PPP on the left-hand side of Winbox and navigate to the Interface tab. Select the SSTP Server button and apply the following settings to configure/enable the SSTP Server. Note that the Default Profile field is using the recently created SSTP01 profile and that the Certificate field is using the “Server” certificate that was created at the beginning of this guide. Also, notice the port that is being used – port 443. We’ll be using this port in the next step to create the firewall rule.
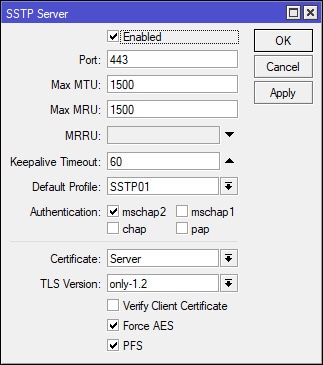
NOTE 04/25/18: In the screenshot above, TLS Version is currently set to “only-1.2”. The VPN connection will fail if the Operating System does not support TLS 1.2. I ran into this issue with Windows 7 SSTP clients. To resolve the connection issue, I changed this particular setting from “only-1.2” to “any”.
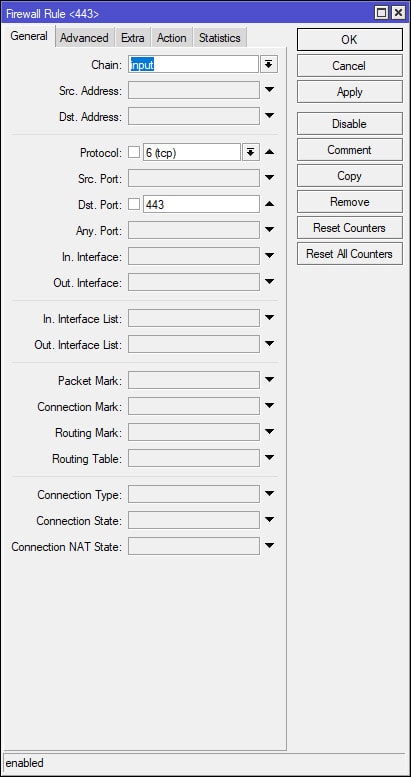
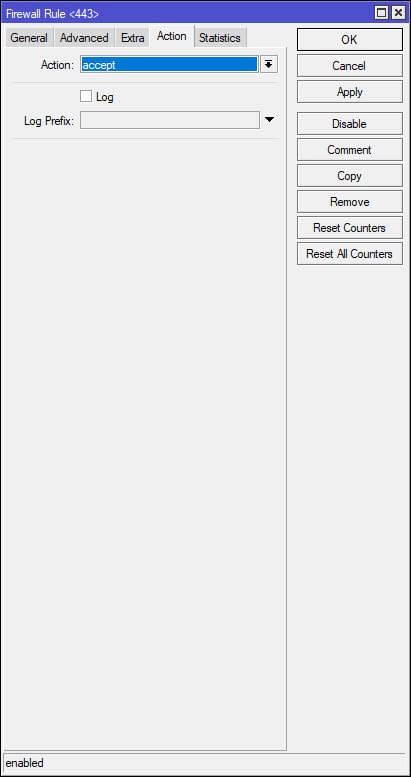
MikroTik: Create SSTP Firewall Filter and NAT Rules
Select [IP > Firewall]. Under the Filter Rules tab add the following firewall rule to allow SSTP traffic to the router from the WAN. Position/Move this rule to the top of your Firewall Filters Rules list or where it best suits your network security policy. This rule allows incoming WAN traffic to the MikroTik over port 443. Add additional firewall rules as necessary to meet your network security policy (see additional commands below). In this example, keep in mind that once the VPN is established, the VPN client(s) will be pulling IP addresses from the previously created DHCP VPN IP Pool (10.10.100.10 – 10.10.100.254).
The following commands will add additional rules that will allow traffic from the VPN’s subnet to/through the router. Once the rules have been created, they need to be placed under the previously created “Allow SSTP” rule (the screenshots above). Again, these rules are very broad, they will allow all traffic from the VPN’s subnet to/through the MikroTik. These rules may need to be modified or additional rules created to comply with your network security policy. Keep in mind that the subnet 10.10.100.0/24 represents the previously created VPN DHCP pool and that the “src-address” value of “ether1” represents the MirkoTik’s WAN interface – change this value as needed.
/ip firewall filter
#Allow VPN subnet traffic to the router.
add action=accept chain=input src-address=10.10.100.0/24
#Allow VPN subnet traffic through the router.
add action=accept chain=forward src-address=10.10.100.0/24
In addition, if VPN clients require internet access through the VPN, the following NAT (masquerade) rule will need to be added.
#Masquerade VPN client traffic for access to the internet.
/ip firewall nat
add action=masquerade chain=srcnat out-interface=ether1 src-address=10.10.100.0/24
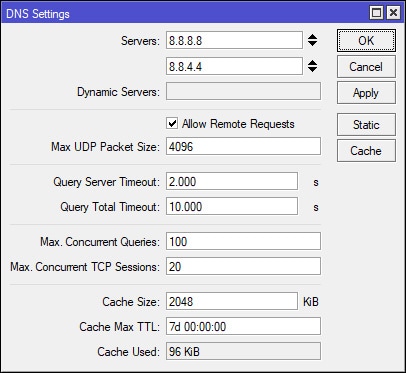
MikroTik: Allow Remote DNS Requests
Select IP > DNS and tick the Allow Remote Requests box shown in the screenshot below. This will allow the router to respond to remote DNS requests. However, it is important to note that in this particular setting, the word “Remote” encompasses both external and internal network requests. Essentially, this includes all DNS requests from both the WAN and LAN. It would be advisable to create a firewall rule to drop DNS requests from the WAN. I’ve provided the following commands below to accomplish this. These commands can be pasted directly into the MikroTik Terminal. Keep in mind that the “in-interface” value will need to reflect the name of the WAN port on your MikroTik.
#Drop DNS Requests from WAN
/ip firewall filter
add action=drop chain=input connection-state=new dst-port=53 in-interface=ether1 protocol=udp
add action=drop chain=input connection-state=new dst-port=53 in-interface=ether1 protocol=tcp
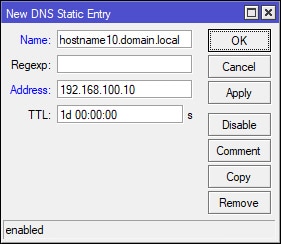
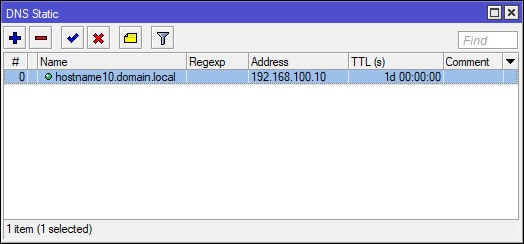
MikroTik: Create Static DNS Entries (Optional)
I’ve marked this section as optional, since this may not be required for the majority of the network environments out there. As previously mentioned at the beginning of this guide, SiteX is not your typical network, which may include a domain controller and authoritative/dedicated DNS server. This is something you will want to keep in mind since SiteX’s MikroTik is the only device resolving local DNS/hostnames. In addition, none of the devices on SiteX’s network are part of a domain. Remember this going forward as you will want to adjust your settings accordingly.
Since ClientX is connecting to SiteX, a workgroup/non-domain environment with the MikroTik as the only device to resolve local DNS/hostnames, I’ve had to make a few changes in order to get hostname resolution to work for ClientX when attempting to resolve hostnames on SiteX’s network. I was required to use a DNS suffix for static DNS entries for hosts on the MikroTik. For example, hostname10.domain.local (NOT hostname10). In addition, the domain suffix would need to be added to ClientX’s VPN adapter configuration, which is covered later in the guide. After both conditions have been met, ClientX was able to resolve hostnames on SiteX’s network. Just keep in mind that anything you do on ClientX that involves a hostname that exists on SiteX will require the FQDN hostname.
Windows 10: Install the "CA" Certificate
We’ve completed the SSTP VPN setup for SiteX on the Mikrotik and will now need to configure the VPN on the client-side for ClientX’s Windows 10 machine. Earlier in this guide, we exported the “CA” certificate using the MikroTik at SiteX.
- In Winbox, select Files on the left-hand side. If you’ve been following the naming conventions of this guide, the file should be named “cert_export_CA.crt”. Drag or Download (right-click > download) the file to a safe location on your computer.
- Now that the CA certificate has been downloaded from the MikroTik, we will need to transfer the certificate to ClientX’s Windows 10 machine, I’ll let you decide how this is done.
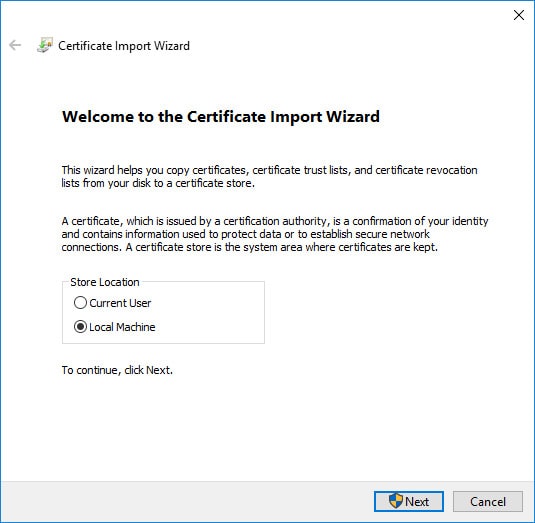
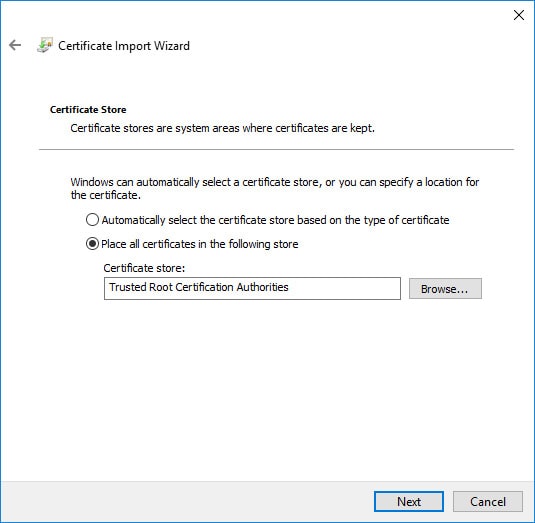
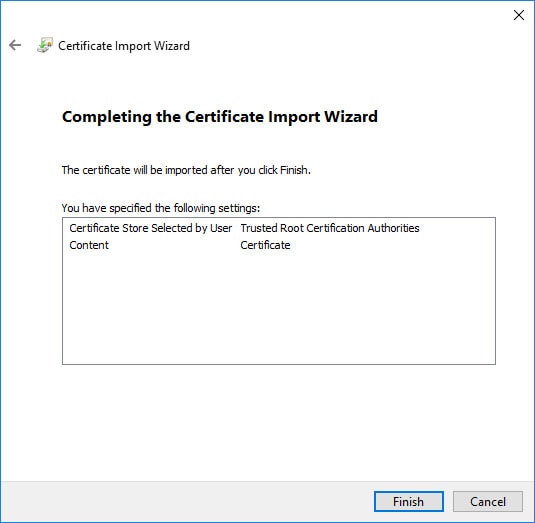
- After transferring the CA certificate to ClientX, right-click on the certificate and select “Install Certificate” from the context menu and use the following screenshots below to complete the CA certificate setup for ClientX’s SSTP VPN:
Windows 10: Create the VPN/Network Adapter (NON-Split Tunnel)
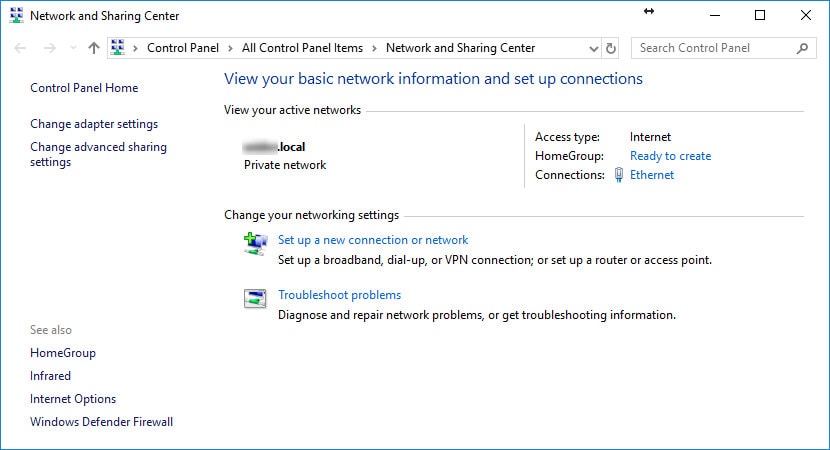
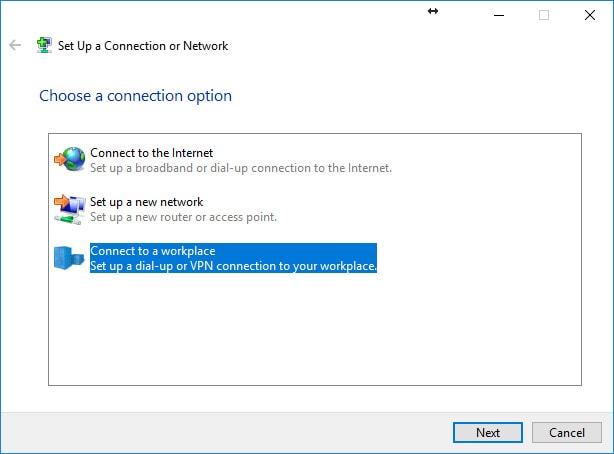
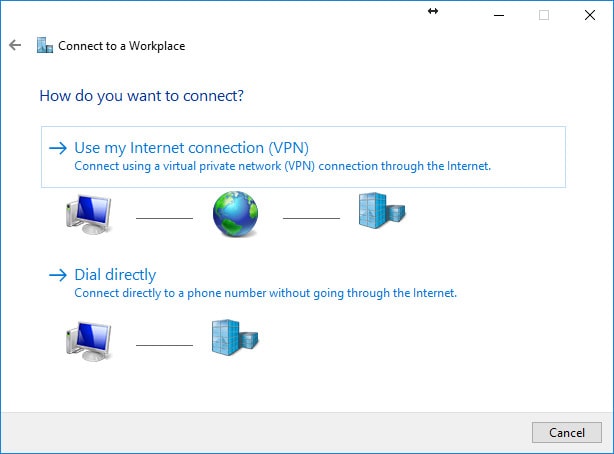
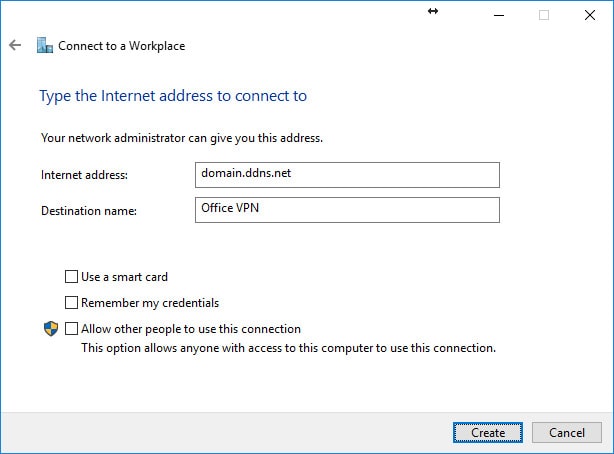
We’ve completed the Windows 10 “CA” certificate install for ClientX and now need to create ClientX’s Windows 10 VPN/network adapter. In the Windows 10 Control Panel, open Network and Sharing Center. Select “Set up a new connection or network” and use the following screenshots below to create the VPN/network adapter.
Option 1 - Windows 10: Configure the VPN/Network Adapter Without Split Tunneling
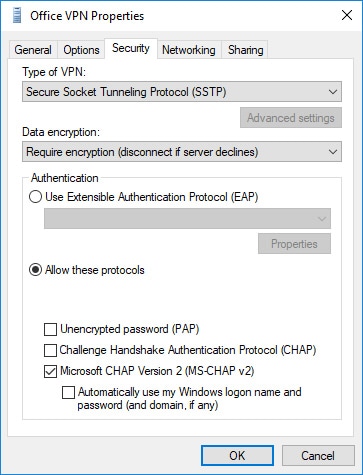
We’ve completed the creation of the VPN/network adapter and now need to configure the adapters SSTP and security settings. In Windows 10, Navigate to Control Panel (may need to set “View by” to “Small Icons”) > Network and Sharing Center > Change adapter settings. Locate the VPN/network adapter (e.g. Office VPN), right-click on the adapter and select properties from the context menu. Use the following screenshots below to configure the VPN/network adapter.
Option 2: Windows 10 - Create/Configure the VPN/Network Adapter With Split Tunneling
This second option involves creating a brand new adapter via the Connection Manager Administration Kit (CMAK), a feature that can be added to Windows and used to create executable files for the deployment/setup of VPNs. This method is being used because of it’s ability to add custom routetables post connection. The routetable is added to ClientX’s Windows 10 machine after the VPN connection is established, all traffic destined for SiteX is routed through the VPN gateway to SiteX, while all other traffic is routed through ClientX’s local gateway. The step-by-step guide for this particular setup can be found in MikroTik: Setup A Client-to-Site SSTP VPN (Part 2).
Hello,
I’d like to ask how can we make the sstp clients reachable for the mikrotik lan hosts. After following the tutorial the sstp clients are isolated over networks having network mask cidr /32 and they are not accessible for the lan network hosts.
Best Regards,
Andrew
Hello Andrew,
How are you attempting to reach and/or test the connection to the client? I’m able to successfully ping and map network shares (share created on the SSTP client machine) on my Windows workstation, which is behind the MikroTik LAN and vice versa. Also, are you testing using IP, hostname or both? In my test case for this comment, I used the VPN assigned IP of the SSTP client to map a network share I created on the SSTP client machine to my workstation on the MikroTik LAN. I believe I ran into the same issue with the SSTP client using /32 when reviewing the Windows route table (Route Print), to my understanding this is how Windows handles SSTP. However, the client was using the wrong gateway to communicate back to MikroTik Lan. I had to add a persistent route on the SSTP client’s windows machine to direct all traffic destined for the VPN gateway to the correct network adapter/interface. The command looks similar to this:
route -p ADD 192.168.100.0 MASK 255.255.255.0 10.10.100.1 METRIC 1
Where 192.168.100.0 is the local network for the MikroTik, 255.255.255.0 is the Subnet Mask and 10.10.100.1 is SSTP client’s network adapter gateway. This way, all traffic destined for your MikroTik’s LAN will go out the VPN adapter/interface. I cover some of this in part 2 of the guide, but use CMAK, which is a way to package the VPN client setup and automate modification of the route table.
Hi Marthur, thanks for the guide. Just a thing: once the vpn is estabilished, I cannot go outside in internet. The dns requests arrive to Mikrotik SSTP server but I think a masquerade is missing.
Masquerading the vpn pool I can go in Internet with the Mikrotik SSTP server IP.
Am I missing something or your guide is made for not surfing internet throght the vpn?
Thanks in advance, Simone
Hello Simone,
Thank you for chiming in on this. Your probably right about masquerading the VPN DHCP pool, I’m currently using split-tunneling with my VPN so that all internet traffic goes out the clients’ local gateway and not out the SSTP servers gateway. I’ll test it out using the servers gateway and see if I can pass internet traffic, but I do believe your right and you have to masquerade the VPN DHCP traffic. I have a NAT rule for it in my MikroTik, but looks like I’ve disabled it, since I’m using split-tunneling. I’ll double check though, thanks again for your input!
Hello again! I just tested the VPN without split-tunneling so that all traffic (including internet) passes through the VPN servers gateway and I can confirm that I was unable to resolve DNS without the masquerade rule in place. After adding the masquerade rule for the VPN servers VPN DHCP pool I was able to resolve web addresses without issue on the VPN client. I probably already had the masquerade rule in place prior to creating the guide and forgot to include it. Thank you for catching and reporting the exclusion of this important step. I’ll have the guide updated shortly!
Hello!
I am a beginner in using tunnels (also I use Webfig and not direct CLI commands, so your guide is best for me in this regard), but I would like to connect two homes that are both using Mikrotik devices on WAN links with a SSTP tunnel (and then build an EOIP tunnel on top of that to keep the same broadcast domain between them).
So I used your guide to create CA and server certificates, but don’t know exactly how to proceed from that point onward (I should probably also create a client certificate I guess?). Do you think that you would be able to help?
Thanks!
Hello Stefan,
I haven’t worked with a site-to-site tunnel for SSTP yet, I plan on doing so in the near future and I’ll write a how-to article on it once I’m done testing. I’ve been busy with work related projects so haven’t had much time dedicate towards website articles at the moment. I would check out the following link to see if it can help get you started the site-to-site setup is near the bottom:
https://wiki.mikrotik.com/wiki/Manual:Interface/SSTP
Hi Marthur,
First of all thank you for this guide but unfortunately my Mikrotik is working in bridge mode (an other device working as a router so I have forwarded a port actually TCp 3443). Bridge has an IP address from my local subnet and dhcp pool is also use addresses from this subnet. So I try to change some things regarding my configuration e.g. I try to configure the bridge in PPP profile and so on but I always got error message from built-in windows vpn client ( a connection to the remote computer could not be established so the port used this connection was closed ). On firewall connection tab I see time wait ….
What do you think how should I modify my configuration?
Thanks in advance
Balazs
Very good guide.
It helped me creating a SSTP server, with ActiveDirectory Radius interation and Custom access inside a company network.
Excellent, thorough tutorial. Had it working first try. Thanks very much!
Hi Marthur
Excellent Guide. Thanks to give us the excellent guide.
About the routes in windows 10 is possible to configure the connection to not add default route and use powershell to define others routes.
PS C:\> Add-VpnConnectionRoute -ConnectionName “Contoso” -DestinationPrefix 176.16.0.0/16 -PassThru
More information in site:
https://docs.microsoft.com/en-us/previous-versions/windows/powershell-scripting/dn262649(v=wps.630)?redirectedfrom=MSDN
Thanks in advance
Claudio Jr.
Excellent tutorial, crystal clear, perfectly working 🙂